Flying Model Airplanes
First Flight Walk-Through
Flying model airplanes is a blast once you get the hang of it. If you're new to the hobby make sure to read the page How to Fly RC Airplanes for tips and advice on how to be successful in this hobby.
The page you are reading now will let you know what to expect through each step of your first flight.
After that first flight you will be dreaming about flying model airplanes day and night! Don't say I didn't warn you...
Is it Windy? Don't Risk It
Your new plane arrives in the mail, you get her assembled, batteries
charged and you're ready to go. Like a little kid waiting for Christmas
morning, you're chomping at the bit to get that bad boy in the air!
You walk outside and notice it's a bit breezy. A little voice is telling you "C'mon man, it's not that windy." Yet you know deep down that you probably shouldn't attempt to fly...
Let's just say I was naive and listened to that little voice, my first airplane had a short life.
Learning to fly is a challenge in and of itself. I'm telling you from experience that it's in your and your plane's best interest to wait until there is little to no wind for that first flight!
This is especially important for park flyers.
Try to find a day when the wind is less than 5 mph. In the summer time it is usually fairly calm in the early morning. It also usually calms down dramatically about an hour before sunset. These are good times for flying model airplanes.
Pre-Flights Checks
Flying model airplanes requires very close attention to detail. It is important to go over your entire airplane with a fine tooth comb before taking off.
Here is a pre-flight check list that you can use to ensure that your bird is flight worthy.
Stick Sensitivity
The transmitter sticks have to be moved VERY gently when flying model airplanes.
|
Think of it as driving a car down the expressway. It takes very small movements of the steering wheel to keep the car on the road. This same is true with RC airplanes.
This is one of the most important things to remember when flying model airplanes. Most beginners tend to over control the airplane and this can lead to a crash in a hurry! |
 |
Ready for Taking Off!
|
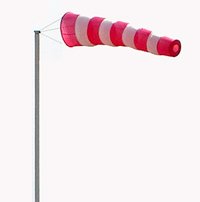
When flying model airplanes it is crucial to know where the wind is coming from. If a windsock is not at the flying site, keep a piece of string tied to the end of your antenna. |
 |
Most park flyers have to be hand launched. If this is the case, give the airplane a good toss straight forward against the wind while applying full throttle. Make sure you throw it straight forward, not up or down.
Below is a video of me hand launching my ParkZone Stryker. It's shot and narrated by my 6 year old son. He's quite entertaining in this clip!
ParkZone F27Q Stryker Hand Launch
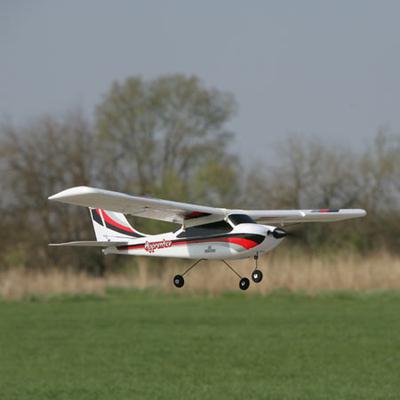
Trainers, and some park flyers, take off from the ground just like full-scale airplanes. Place the airplane on the runway. Slowly give throttle while keeping the airplane straight with the left stick (rudder).
A nitro engine will tend to make the airplane want to turn right due to the engine torque. You have to counter this with the rudder. Keep applying more and more throttle until the airplane begins to lift. At this point give slight elevator and watch the airplane climb.
When taking off, it is important not to give too much elevator. If too much elevator is applied without enough airspeed, the airplane will stall and crash. Keep the airplane straight and continue to climb until it is at a safe altitude. Try to keep the airplane at an elevation around 100 ft or so. The golden rule when flying model airplanes is to keep the airplane at least three mistakes high!
Below is the video of my CG Chipmunk taking off for the first time.
Carl Goldberg Super Chipmunk Maiden Flight
This was the second plane I built from a kit. You can see pictures of the build process here if you're interested.
She's in The Air, Now What?
Once the RC airplane reaches a safe altitude use the rudder or ailerons (depending on the airplane you have) to slowly turn the airplane. All airplanes loose elevation while turning, so it's important to give a bit of elevator when making turns. Keep making gentle turns as you fly in a circle around the flying area.
When flying model airplanes, everything will seem backwards when the airplane is coming towards you. Dont flip out!
A good technique is to turn your shoulders in the direction the airplane is moving while turning your head to see the airplane. This tricks your brain into moving the sticks in the right directions. It really works!
Remember to make every movement SLOWLY, barely moving the sticks.
If at any point you feel like the RC airplane is out of your control, the best thing to do is cut the throttle! If a crash is inevitable, your airplane has a much better chance of survival if the engine isnt propelling it to the ground!
Trimming Your Airplane
Once in the air, you'll probably notice the airplane slightly turning without your input. The airplane may also be climbing or descending. This is because the airplane is out of trim.
To trim the airplane, move the trim tabs on the transmitter until the airplane flies straight and level without moving the sticks on the transmitter.
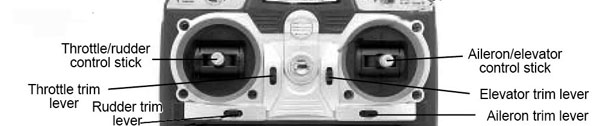
The trim tabs, or levers, are labeled in the above image from the Futaba 6EXA manual. When flying model airplanes with gas or nitro engines, the center of gravity will change slightly as the fuel burns. You may feel it necessary to trim the elevator down a click or two as needed throughout the flight.
How to Land Your RC Airplane
Landing is probably the scariest part of learning to fly RC airplanes. I used to dread the airplane landing when I first started. But it didn't take long before I was doing touch and goes trying to perfect my landings. Practice makes perfect!
For flying model airplanes, you need to be familiar with what is called the landing pattern. A landing pattern consists of four legs which are the upwind, crosswind, downwind, and base legs. The final approach is the portion of the landing pattern where the airplane lands, and it is on the first part of the upwind leg. The pattern reverses depending on which direction the wind is coming from. The picture is fairly self explanatory.
Practice this pattern several times before you actually try to land your plane. You should be flying a large rectangular pattern with nice rounded corners. Make your cross wind and base legs ample long enough to give you plenty of time to make nice gentle turns onto the downwind and upwind legs respectively.
When you are ready to land, cut the throttle to about half when the airplane is directly across from you on the downwind leg. Start giving a little elevator to slow the RC airplane down. Decrease the throttle a little more just after you turn onto the base leg.
As you enter the final approach, give just enough elevator to keep the nose of the airplane level to slightly down. You will find that when the airplane is landing, the elevator controls the speed of the airplane. The more up elevator you give, the slower the airplane will go.
You will also notice that the throttle controls the elevation of the airplane during landing. The more throttle you give the more the airplane will climb. This may seem counter intuitive, but it really is the case.
If you begin your decent at the right time there should be no need to apply any throttle while landing. If it looks like the airplane is going to land short of the runway, gently work the throttle and elevator together to bring the airplane down nice and slow.
Be careful, too much elevator and not enough throttle will cause the airplane to stall. If you don't feel comfortable during the final approach, then abort the landing and try again.
Keep the wings level during the final approach. The airplane will be heading towards you so the controls will seem backwards. To keep the airplane level when it is flying toward you, move the right transmitter stick towards the lowest wing.
When the airplane is a couple of feet off the ground, slightly increase the elevator to bring the nose up flare and let the airplane settle gently on the runway. Now you can breathe again!
Be sure to read these pages as well...
- Choosing Your First RC Airplane
- How to Fly RC Airplanes
- First Flight Walkthrough
- RC Airplane Controls
- RC Trainer Traits
- Flight Simulators
- Model Airplane Accessories
Home > How to Fly RC Airplanes > First Flight Walkthrough
Let’s Go Flying! |
|
5 Steps for Successful First Flight! When the RC bug bites, it bites hard! Control yourself my friend! Save yourself much time and money by following these five steps to success! |

|
Follow us on: |
|
|